Delta Shower Door Installation: A Comprehensive Guide
Navigating Delta shower door installations requires readily available instructions, often found as PDF guides. These documents detail specific model setups – EverEdge, Paxos, and Classic 500 –
providing step-by-step guidance for a successful DIY project.
Understanding Delta Shower Door Models
Delta offers a diverse range of shower door models, each with unique installation nuances. Understanding these differences is crucial before beginning any project. The EverEdge series, known for its sleek, minimalist design, often requires specific attention to glass alignment and sealing, as detailed in its dedicated installation PDF.
The Paxos model, frequently featured in instructional videos, emphasizes a straightforward installation process, but still benefits from careful adherence to the provided PDF guide. Classic 500 doors, while more traditional in appearance, demand precision during base and vertical support attachment, information readily available in their respective installation manuals.
Accessing the correct PDF for your specific model is paramount. These guides outline necessary tools, parts lists, and detailed diagrams. Ignoring model-specific instructions can lead to improper installation, leaks, or even damage to the door. Online resources and Delta’s official website are key to locating the appropriate installation PDF for a smooth and secure installation.
Gathering Tools and Materials
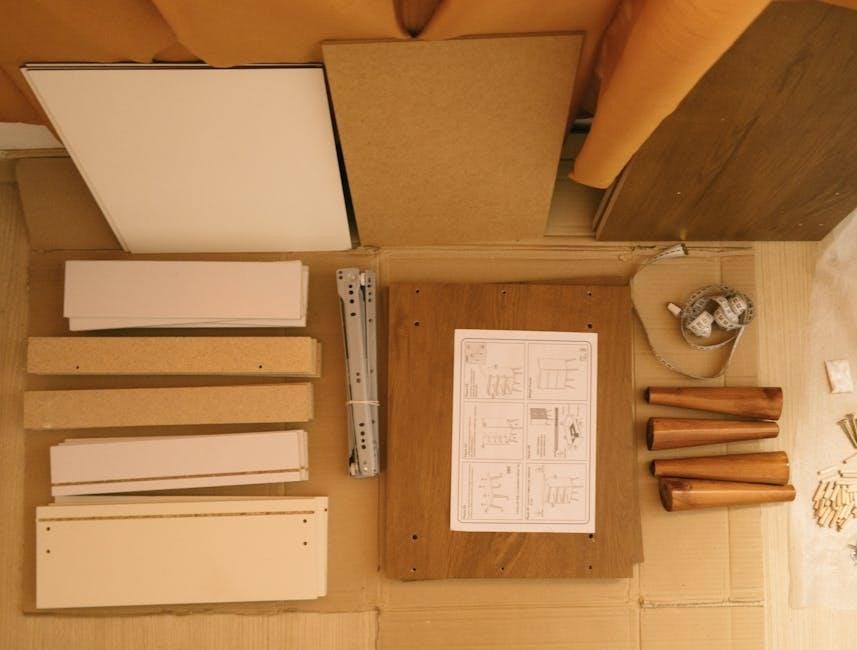
Before consulting the Delta shower door installation PDF, assemble the necessary tools and materials. A standard toolkit should include a level, measuring tape, silicone gun, drill with appropriate bits, and a screwdriver set. Specific models, like the EverEdge, may require specialized tools for glass handling, as noted in their installation guides.

Beyond tools, verify you have all listed components from the Delta packaging. The PDF will detail a parts list – base (threshold), vertical supports, top rail, door panels, handles, and sealing materials. Ensure you have sufficient silicone sealant, compatible with wet environments, as highlighted in the installation instructions.
Reviewing the Delta model’s PDF beforehand will prevent mid-installation delays searching for missing items. Having everything readily available streamlines the process, minimizing frustration and ensuring a professional finish. Don’t underestimate the importance of safety gear – gloves and eye protection are recommended throughout the installation, as suggested in the installation manuals.
Preparing the Shower Opening
Prior to commencing installation, meticulously prepare the shower opening, referencing the Delta shower door installation PDF for model-specific requirements. Begin by thoroughly cleaning the existing surface, removing any old sealant, grime, or debris. The PDF emphasizes a clean, level surface for optimal sealing and door function.
Carefully measure the opening’s dimensions – width, height, and plumb – comparing them against the Delta door’s specifications detailed in the installation instructions. Any discrepancies must be addressed before proceeding, potentially requiring shimming or adjustments to the surrounding walls. The EverEdge and Paxos models, in particular, demand precise measurements.
Inspect the wall structure for stability and ensure it can support the door’s weight. The installation PDF may advise reinforcing weaker areas. Finally, protect the surrounding floor and walls with drop cloths to prevent damage during installation, a common recommendation found within the Delta guides.
Installing the Base (Threshold)
The Delta shower door installation PDF consistently highlights the base (threshold) as a critical first step. Begin by applying a bead of silicone sealant along the shower floor where the base will sit, ensuring a watertight seal. Refer to the instructions for the correct sealant type – often specified within the PDF.
Carefully position the base within the opening, aligning it precisely with the Delta door’s specifications. The installation PDF will detail specific alignment points and may recommend using shims to achieve a perfectly level surface. Secure the base using the provided screws, ensuring they are tightened appropriately – avoid over-tightening.
For models like the Classic 500, the PDF may illustrate specific base installation techniques. Double-check the base’s stability and ensure it’s firmly anchored before proceeding. A properly installed base is fundamental to preventing leaks and ensuring the door operates smoothly, as emphasized in all Delta guides.
Attaching the Vertical Supports
The Delta shower door installation PDF meticulously details attaching the vertical supports, often referred to as side panels. These supports are crucial for the door’s stability and alignment. Begin by applying a thin bead of silicone sealant to the base where the supports will connect, mirroring the base installation process detailed in the instructions.
Carefully position the vertical supports, ensuring they are plumb (perfectly vertical). The PDF will likely illustrate the correct orientation and may specify the use of temporary bracing to hold them in place. Secure the supports to the base and, if applicable, the shower wall studs using the provided screws.
Delta’s installation PDF guides emphasize the importance of accurate screw placement; For models like the Paxos, the instructions may include diagrams showing precise screw locations. Regularly check for plumb throughout the process, making adjustments as needed. Properly secured vertical supports are essential for smooth door operation and preventing future issues.
Installing the Top Rail
The Delta shower door installation PDF guides clearly outline the top rail installation process, a critical step for structural integrity. Begin by applying a continuous bead of silicone sealant along the top edges of the vertical supports, as illustrated in the instructions. This creates a watertight seal and prevents future leaks.
Carefully position the top rail onto the vertical supports, ensuring it’s flush and aligned. The PDF will likely specify the correct orientation and may highlight key alignment points. Secure the top rail using the provided screws, tightening them evenly to avoid distortion.
For models like the EverEdge, the Delta installation PDF may detail specific techniques for securing the rail to the wall studs, enhancing stability. Double-check the rail’s levelness and plumbness before fully tightening the screws. A properly installed top rail provides essential support for the door panels and contributes to the overall rigidity of the shower enclosure.
Hanging the Door Panels
Referencing the Delta shower door installation PDF is crucial when hanging the door panels. Most models, including the Paxos, utilize pivot or roller mechanisms. Carefully lift the door panel(s) and align the hinges or rollers with the corresponding tracks on the top rail and base. The instructions will detail the correct lifting technique to avoid damage.
Gently guide the panels into the tracks, ensuring they seat properly. Some Delta models may require slight manipulation or adjustment to fully engage the rollers. The PDF often includes diagrams illustrating the correct panel placement and track engagement.
Once the panels are hanging, temporarily secure them with tape or clamps to maintain alignment during the adjustment phase. Avoid forcing the panels, as this could damage the hinges or tracks. The Delta installation PDF will emphasize the importance of a smooth, controlled hanging process for optimal door operation.
Adjusting Door Alignment
The Delta shower door installation PDF highlights alignment as a critical step. After hanging the panels, check for smooth operation and proper closure. Most Delta models feature adjustable rollers or hinges. Use a level to ensure the door panels are plumb and square with the shower opening.
Refer to the PDF for specific adjustment procedures for your model – EverEdge, Paxos, or Classic 500. Typically, adjustments involve loosening screws and slightly shifting the rollers or hinges until the desired alignment is achieved. Tighten the screws securely once the alignment is correct.
Pay close attention to the gap between the door panels and the surrounding frame. The installation instructions will specify the acceptable gap range. Consistent gaps ensure a watertight seal and prevent binding. Re-check the door’s swing and closure after each adjustment to confirm proper functionality.
Installing Handles and Towel Bars
The Delta shower door installation PDF details handle and towel bar attachment, typically occurring after door panel alignment. These components usually secure with screws, and the PDF will specify the correct screw size and type for your model – EverEdge, Paxos, or Classic 500.
Carefully position the handle on the door, ensuring it’s aligned correctly and provides a comfortable grip. Use a screwdriver to gently tighten the screws, avoiding over-tightening which could damage the glass. Similarly, install towel bars according to the PDF’s diagrams, ensuring they are level and securely fastened to the frame or door.
The installation instructions often recommend using a protective cloth between the screwdriver and the handle/towel bar surface to prevent scratches. Double-check that all screws are fully tightened and that the handles and towel bars are stable before using the shower door.
Sealing the Shower Door
The Delta shower door installation PDF emphasizes the crucial step of sealing to prevent leaks. Typically, this involves applying a high-quality, mildew-resistant silicone caulk along the edges where the glass meets the frame and the wall. The PDF will specify the type of caulk recommended for optimal adhesion and water resistance.
Before applying caulk, ensure all surfaces are clean, dry, and free of debris. Apply a consistent bead of caulk, then smooth it out with a caulk smoothing tool or a wet finger (wearing a glove!). Pay close attention to corners and seams, ensuring a complete and watertight seal.
The installation instructions for models like EverEdge, Paxos, and Classic 500 may have specific sealing requirements. Allow the caulk to cure completely – usually 24-48 hours – before using the shower. Inspect the seal regularly and reapply caulk as needed to maintain a leak-free shower enclosure.
Troubleshooting Common Issues: Door Alignment
The Delta shower door installation PDF often addresses door alignment issues as a common concern. Misalignment can cause binding, difficulty closing, or leaks. The PDF guides users to check the vertical supports and top rail for proper positioning, referencing diagrams for correct placement.
Adjustment is typically achieved through the adjustable rollers or hinges. The instructions detail how to loosen screws and gently shift the door panel until it aligns correctly with the frame. Ensure the door swings smoothly and closes completely without resistance;
For models like EverEdge, Paxos, and Classic 500, specific adjustment points are highlighted in the PDF. If significant misalignment persists, re-examine the base (threshold) for levelness, as an uneven base can contribute to alignment problems. Always tighten screws securely after adjustments, but avoid over-tightening.
Troubleshooting Common Issues: Leaks
Delta shower door installation PDF guides frequently dedicate sections to resolving leaks, a common post-installation issue. The instructions emphasize the importance of thorough sealing during installation, particularly around the base, vertical supports, and top rail.
If leaks occur, the PDF advises inspecting the silicone caulk application. Ensure a continuous, watertight bead exists along all seams. Re-apply caulk if gaps or cracks are present, following the PDF’s recommendations for appropriate sealant type.
For EverEdge, Paxos, and Classic 500 models, the PDF may highlight specific leak points based on design. Check the door panels’ alignment, as misalignment can compromise the seal. Verify the drain is clear of debris. If leaks persist after resealing and alignment checks, consult the PDF for model-specific troubleshooting steps or contact Delta support.
Delta EverEdge Installation Specifics
The Delta EverEdge installation instructions PDF details a unique frameless design, requiring precise alignment and sealing. These PDF guides emphasize the importance of a level and structurally sound shower opening before beginning. The instructions highlight the EverEdge’s minimal profile, demanding careful handling of the glass panels.
PDF guides showcase the specific base (threshold) installation for EverEdge, often featuring a low-profile design. Detailed diagrams illustrate proper silicone application along the base and where it meets the tile or shower pan. The instructions stress the need for continuous, watertight seals.
The Delta PDF also provides guidance on vertical support attachment, ensuring plumbness for proper door function. It details specific screw placement and torque recommendations. Video tutorials, often linked within the PDF, demonstrate the process visually, aiding DIY installers.
Delta Paxos Installation Specifics
The Delta Paxos installation instructions PDF focuses on its semi-frameless design, differing from the EverEdge. These PDF guides emphasize careful handling of the glass panels and the specific order of assembly. The instructions detail the Paxos’s unique roller system, crucial for smooth door operation.
PDF documentation highlights the base installation, often requiring precise measurements to ensure a snug fit within the shower opening. Diagrams illustrate proper alignment of the base with the surrounding walls. The instructions stress the importance of a level surface for optimal performance.
The Delta PDF provides detailed steps for attaching the vertical supports and top rail, emphasizing secure fastening. It includes torque specifications for screws and guidance on adjusting the rollers. Instructional videos, often linked within the PDF, visually demonstrate the installation process, aiding DIYers. Proper alignment is key, as detailed in the instructions.
Delta Classic 500 Installation Specifics
The Delta Classic 500 installation instructions PDF details a more traditional framed shower door system. These PDF guides emphasize the importance of accurately measuring the shower opening before beginning, as the frame requires precise dimensions. The instructions highlight the frame assembly process, detailing how to connect the vertical and horizontal components.
PDF documentation stresses the proper installation of the glass panels within the frame, ensuring a watertight seal. Diagrams illustrate the correct placement of the weather stripping and silicone caulk. The instructions often include a parts list to verify all components are present before starting.
The Delta PDF provides specific guidance on installing the rollers and adjusting the door for smooth operation. Torque specifications for screws are included to prevent over-tightening. Instructional videos, often referenced in the PDF, visually demonstrate the installation steps. Careful attention to detail, as outlined in the instructions, is crucial for a leak-free installation.
Understanding Delta Shower Door Diagrams (PDFs)
Delta shower door installation instructions PDFs heavily rely on detailed diagrams to illustrate each step. These aren’t just simple sketches; they are exploded views showcasing component placement, fastener locations, and crucial alignment points. Understanding these PDF diagrams is paramount for a successful installation.
The diagrams typically differentiate between various models – EverEdge, Paxos, Classic 500 – with unique visual cues. Pay close attention to the callouts identifying specific parts and their orientation. PDF diagrams often include multiple views of the same assembly, providing clarity from different angles.
Successfully interpreting these PDF diagrams requires recognizing common symbols used in technical drawings. Arrows indicate direction, dotted lines represent hidden features, and dimensions provide precise measurements. Many Delta PDF guides cross-reference diagrams with step-by-step text instructions, reinforcing understanding. Utilizing these visual aids minimizes errors and ensures proper assembly.
Finding Delta Shower Door Installation PDFs Online
Locating Delta shower door installation PDFs is generally straightforward. The official Delta Faucet website is the primary source, offering a comprehensive archive of instructions for current and discontinued models. Utilize their search function, filtering by shower door series (EverEdge, Paxos, Classic 500) for targeted results.
Beyond the official site, numerous third-party resources host these PDF guides. YouTube video descriptions often contain direct links to relevant installation manuals. Retailer websites, like Home Depot and Lowe’s, frequently provide downloadable PDF versions of Delta’s instructions within their product pages.
A simple Google search using terms like “Delta [model number] installation instructions PDF” yields a wealth of results. Always verify the PDF’s authenticity by confirming it originates from a reputable source. Ensure the PDF matches your specific Delta shower door model for accurate guidance.
Safety Precautions During Installation
Prioritizing safety during Delta shower door installation is crucial. Always wear safety glasses to protect your eyes from glass fragments and debris. Work gloves are essential to prevent cuts from glass edges and metal components. A dust mask is recommended when drilling or cutting materials, minimizing inhalation of particles.
Ensure the work area is well-lit and free of obstructions. When using power tools, strictly adhere to the manufacturer’s safety guidelines. Be mindful of electrical wiring and plumbing within the shower area; turn off water supply before commencing work.
Lift heavy components, like glass panels, with assistance to avoid strain or injury. Properly support the door during installation to prevent accidental falls. Carefully read and understand the Delta’s installation instructions PDF before beginning, paying close attention to any safety warnings or cautions.
Post-Installation Maintenance and Care
Maintaining your newly installed Delta shower door ensures long-lasting beauty and functionality. Regularly clean the glass with a non-abrasive shower cleaner to prevent water spots and soap scum buildup. Avoid harsh chemicals or scouring pads, as these can damage the glass coating.
Inspect the seals and caulking around the door periodically for any signs of cracking or deterioration. Re-caulk as needed to prevent leaks and maintain a watertight seal. Check the door’s alignment and tighten any loose screws or hardware.
Refer to the Delta installation instructions PDF for specific cleaning recommendations related to your model (EverEdge, Paxos, Classic 500). Proper care, as outlined in the documentation, will protect your investment and keep your shower door looking pristine for years to come. Gentle cleaning and proactive maintenance are key.
Resources for Additional Help
Encountering difficulties during or after your Delta shower door installation? Numerous resources are available to assist you. The official Delta website provides a comprehensive library of installation instructions PDFs, categorized by model – including EverEdge, Paxos, and Classic 500 – offering detailed guidance.
YouTube is a valuable source, hosting numerous video tutorials demonstrating the installation process step-by-step. Search for “Delta shower door installation” to find relevant videos. Delta Shower Doors’ official channel often features instructional content.
For personalized support, contact Delta’s customer service department directly. Online forums and home improvement websites can also connect you with experienced DIYers and professionals willing to share advice. Remember to have your model number handy when seeking assistance, and always refer to the original PDF for accurate information.